Weekly Deals
 Water Heaters
 Accessories
 Installation
 Parts
Parts
 Protection Plans
 Final Sale


DIY Installation Tips for Your New Eccotemp Tankless Water Heater
Getting Started: Prep and Safety First
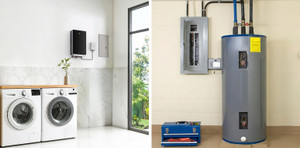
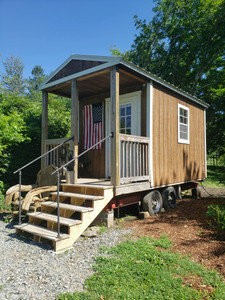
Installing a tankless water heater is an exciting and practical upgrade for any home. With Eccotemp’s reputation for delivering compact, efficient, and easy-to-use models, many homeowners are choosing to take on the installation themselves. Whether you're installing one for your bathroom, outdoor shower, or a tiny home, doing it yourself can save time and money—if done correctly. This guide will walk you through how to install an Eccotemp tankless water heater with DIY-friendly tips that focus on safety, functionality, and long-term performance.
Before jumping into the installation process, it's important to begin with preparation and safety. First and foremost, read the installation manual provided with your water heater. This document contains specific instructions and safety guidelines tailored to your particular model. It's not just a formality—skipping this step can result in improper setup and even void your warranty. Next, check your local building codes and regulations to ensure your project is compliant. Certain regions require certified professionals to handle gas or electrical work, so it’s critical to understand any legal restrictions before you begin.
Turn Off Utilities and Inspect Components
Safety starts with turning off all utilities connected to the water heater location. This includes shutting off the gas supply, cold water line, and electrical source if applicable. Also, inspect all components that came with your water heater. Take inventory of connectors, brackets, and any included accessories to confirm that everything is in good condition.
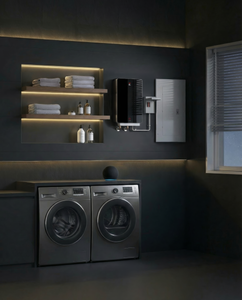
Choosing the Right Installation Location
Choosing the right location for the heater is another foundational step. Whether you’re installing indoors or outdoors, the area should be well-ventilated and easily accessible for future maintenance. For indoor installations, select a wall near an external surface to allow for straightforward venting. For outdoor models, look for a sheltered spot that protects the heater from direct rain, snow, or debris while maintaining good airflow.
Mounting the Water Heater
Once you've chosen the right spot, it's time to mount the heater. Use a stud finder to identify secure areas within the wall and mark the location for the mounting screws. A level is essential here to make sure your heater is straight before drilling holes. After securing the brackets or mounting plate, hang the heater on the wall according to the instructions in the manual. Be sure to maintain adequate clearance on all sides of the heater, as recommended by Eccotemp, to ensure safe operation and optimal efficiency.
Connecting the Water Lines
The next step involves connecting the water supply. You’ll need to attach the cold water inlet and the hot water outlet to your plumbing system. Using flexible stainless steel connectors or copper piping, securely connect the cold water source to the designated inlet. Then, connect your hot water line to the outlet, making sure all fittings are wrapped in Teflon tape or coated with pipe thread sealant to prevent leaks.
It’s highly recommended to install isolation valves on both water lines. This addition will make it much easier to perform maintenance or flush the system without shutting off water to the rest of your home. If your home's water pressure is particularly high—typically above 80 PSI—you may also want to install a pressure-reducing valve to protect your water heater from long-term damage.
Installing the Gas Line (If Applicable)
If your Eccotemp tankless water heater uses propane or natural gas, the next step is to install the gas line. This is a critical phase of installation that should be approached with caution. If you are not confident or experienced in gas plumbing, it's best to hire a licensed gas technician for this part of the job.
For DIYers who are familiar with gas line work, use either black steel pipe or a flexible gas connector that’s specifically rated for water heater use. Include a shutoff valve on the line so you can easily turn off the gas for future servicing. Apply gas-rated pipe thread sealant or tape to the connections and tighten them securely. Once everything is connected, test for leaks using a soapy water solution. Brush or spray the solution onto the joints, and if bubbles form, that’s a sign of a leak that needs immediate attention. Never use an open flame to check for leaks under any circumstances.
Venting the Heater Properly
If you're installing an indoor model, venting is an essential part of the setup. Proper venting ensures safe removal of exhaust gases and prevents dangerous situations like carbon monoxide buildup. Most Eccotemp indoor models use stainless steel vent kits, which can be installed either horizontally or vertically depending on your available space.
Always slope horizontal vent runs upward at about a quarter inch per foot to allow any condensation to drain safely. Follow all instructions closely when assembling vent pipe sections, using the correct sealants as specified in the manual. On the exterior wall, install a termination vent cap to prevent debris, insects, or small animals from entering the vent system. Poor venting design can result in reduced performance and safety hazards, so this step should not be rushed.
Powering Up: Electrical Connection
Some models of Eccotemp tankless water heaters require a power source to ignite the burner and operate the control board or digital display. If yours is one of them, simply plug the device into a nearby grounded GFCI outlet. If your heater needs to be hardwired, follow the detailed wiring diagram in the manual or call a licensed electrician to complete the job.
Before turning the power on, double-check that all wiring connections are secure and away from any potential water exposure.
Initial Startup and Testing
After all plumbing, gas, electrical, and venting connections have been completed, it’s time to test your new water heater. Start by slowly opening the cold water supply valve. Check for any leaks in the water connections and confirm that the pipes are holding pressure. Open a hot water faucet in the house to purge air from the system.
Next, open the gas valve and recheck your gas connections to ensure there are no leaks. Turn on the power or ignition system, then set your desired temperature on the control panel. Open a hot water tap and observe whether the heater ignites as expected. You should begin to feel warm water within a few seconds. Allow it to run for a few minutes and make sure everything is functioning properly. Keep an eye on the control panel and water flow to ensure smooth operation without error codes.
Maintenance Tips to Extend Lifespan
Once your heater is successfully installed, routine maintenance will help keep it running efficiently for years. One of the most important maintenance tasks is flushing the system every 6 months to remove mineral deposits caused by hard water (See our tips on how to descale your water heater here). Use a descaling solution and a circulation pump to clean the internal heat exchanger.
Another useful habit is inspecting the inlet water filter regularly and cleaning it out if it becomes clogged with sediment. This simple task ensures maximum water flow and system longevity. If your heater is installed indoors, periodically inspect the vent system to make sure there’s no buildup of debris or blockages that could restrict airflow or cause safety concerns.
Common Mistakes to Avoid
As you complete your installation, try to avoid common mistakes that can lead to costly repairs or reduced efficiency. Never skip installing a pressure relief valve, as this feature is critical to protecting the water heater from over-pressurization. Make sure your gas and water pipes are properly sized to handle the required flow rate and always follow the manufacturer’s guidelines for clearances and venting specifications. Failing to follow local codes and regulations not only jeopardizes safety but may also void your warranty.
When to Call a Professional
There may be cases where calling a professional is the best choice, especially if your installation involves complex vent routing, unfamiliar electrical work, or if your jurisdiction requires licensed work for gas connections. Don’t hesitate to bring in expert help if you feel unsure at any point. The goal is to install your Eccotemp tankless water heater correctly the first time, ensuring both safety and long-term satisfaction.
Final Thoughts
In conclusion, installing your Eccotemp tankless water heater is a satisfying project that can bring immediate benefits to your household. With the right tools, a solid understanding of your system, and careful attention to detail, you can complete the installation yourself and enjoy endless hot water in a more energy-efficient way. From planning your space and mounting the heater, to connecting the plumbing, gas, and power, each step contributes to a safe and effective installation.
By following this guide and staying attentive to safety and manufacturer recommendations, you’ll be well on your way to a successful DIY installation. If you're ready to install your Eccotemp tankless water heater, start by reviewing your manual, preparing your workspace, and gathering all necessary tools. Take it one step at a time, and don’t rush the process. Your careful approach today will ensure reliable performance for many years ahead.